Games Played — May 2026

The games I played included the following:

Commands and Colors: Ancients

I played The Middle Gate (Thermopylae) scenario from Expansion Pack #6 which presents an overwhelming Persian force with about half the number of opposing Spartans, behind ramparts, featuring a vulnerable flank that can be marched around.

The Persians did the flank march and, despite suffering high casualties, secured the flags (victory points) needed for the win. The final score was 10-6 so the Spartans were well out of touch.

It’s difficult to see how the Spartans can hold out here, especially if the cards aren’t there for the required counterattacks. Both sides had turns where the available cards were useless. I’m thinking of using a house rule to overcome this, such as allowing each player to be able to use any one card as a single unit activation (anywhere on the board) instead of whatever it says on the card.

All of that having been said, it’s a long time since I’d played the system and I enjoyed it much more than I remember.

Fields of Fire

I continued playing the Naktong River Campaign from the Korean War in this top-quality solitaire game system. I completed missions 4 and 5 successfully.

Advanced Squad Leader

I played First Dance (AP228) again, an early war encounter in Belgium between French and German mixed forces of infantry and tanks. The French enter and set up a defense line. The Germans enter and try to break the line.

The Germans lost two key carriers and troops in the first turn and that decided the game, although we kept playing. The Germans made progress but they no longer had the troops required to capture the objectives. The French tank reinforcements are virtyually invulnerable.

A difficult scenario for the Germans, but that maybe only because it was me!

The White Castle Duel

A sophisticated, two-player, worker-placement euro game with a theme about two clans vying for supremacy in technology and trade as the Portugese bring western ideas into Japan.

You play your workers to choose actions and some actions generate more actions or resources which you can use to generate more actions or resources and so on, each player vying for the best victory point score. Of course, there are multiple ways to attain (and calculate!) victory points.

It was too complicated for my taste. (I don’t mind complicated games but in an abstract game the complication has to bring something to my enjoyment. If not, as is the case here, it feels like complication just for the sake of it.)

The game uses a lot of icons to avoid language and eventually I became familiar enough with them, so it gets a pass there.

However, there’s one nuclear option that allows the opponent to screw with the available actions. I seriously doubt the play-balance of the game because of this.

I also didn’t like the use of color: there were 1,001 colors in use, or so it seemed, creating an obstacle to understanding the game.

In short, although I played it twice and tried hard, I didn’t like it. YMMV.

Combat!

Part of a series of solitaire games, this one features US (player) versus German (system) soldiers battling it out in WW2 over a range of scenarios. The rules were lacking, but eventually I cracked the code.

The graphics put walls and hedges in the middle of hexes and that doesn’t work for me. It’s like a perversion of Schrödinger’s cat where the soldier in a wall hex gets the benefit of the wall no matter from which side he is attacked! I applied my own house rule to put the soldier on one side of the wall or hedge.

I don’t think it compares favorably with Ambush because of the design decisions, but it’s a brave try and I’m probably going to invest some serious time in exploring the system and scenarios.

One main criticism is that, for the most part, the system gives the German soldiers orders without any regard as to whether they can see the enemy. Orders are, instead, given based on the soldier’s morale. This can produce surprises as well as strange results. And that may be a fair reflection of the chaos of combat. Alternatively, it may be that more logical action choices should sometimes be taken.

I am still enjoying the game because it does generate a decent narrative. However, because of the stated issues, I am thinking about creating my own version of the solitaire system. There is an updated version that has allegedly made some improvements, and I’ll try and get a look at that.

Games Played — April 2026

This month, the games I played included:

  • Wurzburg — I played scenario one of this classic Modern Battles system from SPI. It went down to the last turn.
  • Advanced Squad Leader — The first scenario was Courage of Cowan (J242) set in December 1944, featuring SS infantry and tanks trying to break through American lines. The Americans held the line for four out of six turns, but the SS broke through on turn five to make the last turn a formality. The second scenario was First Dance (AP228), an early war encounter in Belgium between French and German mixed forces of infantry and tanks. The French first turn saw them enter the map and set up a strong defensive line which hammered the Germans as they tried to break through and that was that.
  • Fields of Fire — I went back to the Naktong River Campaign from the Korean War in this top-quality solitaire game system. I completed missions 1 to 3 successfully.
  • Undaunted: Normandy — A new game to me that combines card management with tactical movement of counters on a board. I had read some reviews but none had triggered a ‘must buy this’ response. After playing it, I know why. In short, it’s half a wargame and half a eurogame. So, it doesn’t fully satisfy on either account. There are a lot of cool ideas, but I won’t be rushing to play it again.

Wolfpack

Wolfpack is a solitaire game in which the player takes the role of the WW2 Germans trying to have their U-boats sink as much Allied merchant shipping in the North Atlantic as possible. Despite the game’s subtitle – Submarine Warfare in the North Atlantic, 1942-44 – the four scenarios provided cover February, March, April and May all in 1943.

The game, designed by James F. Dunnigan, is a high-level, low-complexity treatment of the subject, much of the action being abstracted, though it does enough to reflect some of the real-life challenges and decision making. It was published with S&T 47.

Scale

Each game turn is 24 hours, each hex is 43 nautical miles, and each counter represents individual U-boats or packs of U-boats, a convoy, a group of escort ships, or an unknown number of aircraft. Each scenario is 15 game turns. The game map displays part of the North Atlantic from Britain to Newfoundland.

The Wolfpack map.

Sequence of Play

Convoy Initial Placement

You put the next convoy on the map. Convoys appear in numerical order, alternating from eastern to western-bound, and with a hidden escort. The escort may be a dummy or a real one with a combat strength from 1 to 3.

Weather Phase

In this phase, existing foggy weather is removed, then existing storms randomly move on the map. Convoys that are touched by a storm may straggle making them more vulnerable to U-boat attack. You also randomly determine whether another storm or fogged-in-zone appears.

Air Phase

First, you allocate air units as escort to qualifying convoys. Then you conduct searches for U-boats with remaining air units. Air units may then attack any U-boats they have found. These procedures are programmed into the rules so you cannot cheat the system.

Naval Phase

In this phase, you move each convoy according to a random movement procedure. You may find that a juicy target has moved in a most inconvenient direction! Convoys will move to avoid U-boats spotted in the Air phase. Also in this phase, escorts may search for and attack U-boats they find and U-boats may try and locate convoys that enter one of their search zones. A single U-boat has a single-hex search zone. A wolfpack has a three-hex search zone. If the search turns up a dummy, that convoy is removed from the map.

U-Boat Operations Phase

First, you may freely organize your U-boats that are stacked. A single U-boat has a combat strength of 1 and 8 movement points. A pack of 6 U-boats has a combat strength of 7 and 6 movement points. A pack of 12 U-boats has a combat strength of 15 and 6 movement points, and so on. A pack of 30 U-boats has a combat strength of 40, but only 4 movement points. In this way, the game models the clash between concentration – good for combat, but reducing search capability – and dispersal – good for widening the search, but reducing combat ability.

A bundle of U-boat counters from the game Wolfpack.

Next, you may move your U-boats. If there’s a spotted convoy, you need to move adjacent to be able to attack it. On the other hand, you might try and put your U-boats where you anticipate convoys may sail so you can try and spot them and make them targets.

Combat Phase

Here, U-boats may attack adjacent located convoys. Escorts get to counterattack. Finally straggling – which comes in 2 strengths – is reduced from 2 to 1 or 1 to none.

Game Turn Indication Phase

The almost universal administrative requirement to move on the game turn counter!

Game Play

The first thing to note is that I had no problem with the rules. Indeed, a search for errata was unsuccessful. It appears that SPI learned some lessons from the Fall of Rome game.

The second thing worthy of comment is that the game is easy to play. There are one or two details that are hidden away – like the effects of straggling – which would have been best added to the tables printed on the map. However, this minor issue aside, the game flows well. The sequence of play is straightforward and the game mechanics are logical, well-explained, and easy to do. After the first couple of turns I rarely had to go back to the rule book.

Close up of some convoys and U-boats on the Wolfpack map.

It plays quite quickly though this is dependent on how active you are with your U-boats. For example, if you have widely dispersed your forces and there are lots of searches to do, things will take longer. I finished some game turns in under 10 minutes and I think the longest was about double that.

I managed a German Substantive Victory in my game. This suggests it is too easy to win. However, I wouldn’t take a single game experience as definitive. Further, for some strange reason, I seemed to remember some of the tips and tricks I discovered all those years ago that helped maximize my score. This doesn’t always happen!

Be warned that this game has a lot of luck. You can have a good search result only to find the convoy is a dummy. You can mass your U-boats for an attack only to roll poorly and squander the opportunity. And, as mentioned above, convoys don’t always go where you expect them to.

History

As a high-level look at the topic, the game does a reasonable job of imparting some useful historical patterns. For example, it quickly becomes apparent how important airpower was. Also, weather is a fickle beast that can make convoys more vulnerable but also slow down your U-boats and make discovery harder. The whole convoy movement seems a fiction as in reality the convoys had a route that they followed and it didn’t typically include sudden drastic changes of direction as may occur in the game. The abstraction seems to be design for effect and if you suspend your disbelief a little it makes sense. The game’s optional rules give you added insight to some of the key elements of the historical campaign.

Overall

The physical components are fine: the map and counters are clear and the rules are well done. Given the limitations in place, it’s a fine looking game.

It was fun playing Wolfpack. It wasn’t the toughest challenge, but it was quite quick and provided decent entrtainment. It’s held up reasonably well. It’s not a game you absolutely have to play, but if you get the opportunity it probably deserves some of your time. If you do try it, check out the supporting article in S&T 47 first.

Back to the East

For as long as I have been gaming – and that’s a long time – the WW2 campaign in the east has been one of my favorites to refight. I have a Battalion Combat Series game (Inflection Point – The Battle for Kalach and the Battle of Chir) in the ‘to-be-played’ pile, but it’s a more complex undertaking than I was in the mood for. This meant that a purchase from my recent UK trip, Battles in the East 4: Mius River and Vitebsk, designed by Antony Birkett and produced by Decision Games, touted as part of an accessible game series, was more suitable. And so, it’s now on the table.

Front cover of the Battles in the East 4 box, showing advancing German armor.

Each hex is 5-8km, each turn is 2-3 days, and units are typically regiments, brigades, or divisions. The system is a modern version of PanzeGruppe Guderian and similar games, but with a very neat supply system at its core. In essence, your units only work at full strength when in attack supply. This comes from your HQ units, and – varying from scenario to scenario and turn to turn – is a huge influence on the campaign.

For example, in the Mius River battle, in turns 1-5 the Germans may only have one HQ (of their choice) in what’s called Attack Supply (the best condition) and in turns 6-10, they may have 2 SS Panzer Corps HQ plus any one other HQ in Attack Supply. The Soviets have 5 Shock Army in Attack Supply in turns 1-3, 28 Army in turns 2-3, and 2 Guard Army in 2-4. After turn 4, no Soviet HQ are in Attack Supply. This means the Soviets have to make hay while the sun shines in the early turns and the Germans have to recover their lost ground in the later turns.

While the supply system is simple, it achieves much of what more complex supply systems try to do with far fewer rules and overhead. I like it a lot. It’s not perfect, but it works. Further, you can see how more subtle variations might be utilized in different designs. For example, there might be a game where each side, at the start of the game, has to predesignate which of its HQs are in Attack Supply in which turns. A player might be allowed to change his plan part way through the game, but at a cost in supply availability, victory points, or something else. As another wtist, the rules might limit each HQ to only being in Attack Supply for a limited number of consecutive game turns, reflecting unit fatigue. And so on.

The rest of the mechanics are straightforward: odds-based combat with shifts to reflect terrain and unit integrity (bonuses for keeping formations intact) as well as armor and anti-tank capabilities, leadership, and artillery support.

The physical production standards are good. It has one double-sided, mounted map with excellent graphics, a rulebook printed in color, decent backprinted counters, and play aid charts and tables. The rules don’t seem to have any major holes, though given this is the fourth outing, that’s as it should be. I found two small pieces of errata in the Mius River setup. One was an obvious typo and the other was an extra unit that had been omitted from the setup list.

So, a very playable game, at least superficially. Now I’m going to give it a go and see how it turns out in reality.

Flying Dutchmen

I’m on an American Civil War trip, gaming wise.

I spent some time fiddling around – and largely enjoying – Gettysburg: The First Day, designed by Steve Carey and published by Revolution Games. That game uses the Blind Swords system, meaning formations are activated by chit draws and some of these trigger random events that the players can use to interfere with each side’s plans.

There’s a lot to like: the rules are refreshingly short, the physical production is outstanding, and the game plays quickly enough. The two areas that give me cause for concern are (a) how the players are able to game the random events by sometimes deciding when and where fate strikes the enemy; and (b) how each brigade is automatically able to choose its orders every turn. I don’t know an easy way to fix these, so I need to have a think.

While pondering, I moved on to Last Chance for Victory, the massive game designed by the late Dean Essig and published by MMP about the complete battle of Gettysburg. There’s also a lot to like here: the system – called Line of Battle, now at version 2.0 – has a ton of detail, but once learned goes quite quickly. There are 20+ scenarios in the box ranging from small introductory encounters to teach you the basics of fire and movement, to multi-map campaign scenarios of the whole battle. What’s especially nice is that there are separate 1st day and 2nd/3rd day maps that mean if you are short of space you can still have a go at the bigger scenarios.

The physical production standards here are also good, albeit with one annoying defect: the maps faithfully (I assume) portray the slopes and elevation changes of the battlefield, with each height level represented by a different color. There is a color key, but it does not quite match the on-map colors. Sometimes, it’s hard to work out what level units are on, and what level intervening terrain is. The Blind Swords game by Revolution mentioned above does this much better with the simple addition of a number matching the height on parts of the slope line. It also doesn’t help that the line of sight rules are less than crystal clear. I think I am doing line of sight correctly, but I’m not sure…

Previously I have played the training scenario – Dogs of War – to start me off and then got stuck into the first day of the battle as it begins small and grows and the situation remains – despite me having gamed this situation hundreds of times in different systems – one of my favorites. I have read and reread Pfanz (Gettysburg: The First Day), Martin (Gettysburg July 1) and Gottfried (The Maps of Gettysburg) and am probably nowhere near a complete understanding of what happened all those years ago.

Fighting the first day of the battle has its advantages and disadvantages. On the plus side, you get to see the command system work because things will never go according to plan. However, to maintain a historical encounter, there are quite a few special rules to add to your load. It’s bearable, but if you prefer to avoid these, tackle the second or third day scenarios.

This time around, I redid the Dogs of War scenario to make sure I had the basics well assimilated, then decided to try the Flying Dutchmen scenario which deals with the CSA attack on 11th Corps north of Gettysburg town. The victory conditions demand that within the seven turns the CSA break through the Union defenses and exit 45 strength points of units from the brigades of Hays and Gordon. Breaking through is straightforward enough – the CSA have superior numbers and quality – but doing so fast enough and with low casualties is very challenging. It’s fun for the CSA player whose entertainment includes getting to use some cool sharpshooter units and beating up many low-morale Union units. The Union player has to skilfully defend, knowing that it’s unlikely the line will hold.

Action from the Flying Dutchmen scenario as the brigades of Hays and Gordon attack the Union lines.
Hoke has taken Blocher’s Knoll while Hays and Gordon try to force a final breakthrough. Doles has departed, wounded.

I have played it through to a completion twice, but have yet to get a CSA win. The last occasion, I was a single strength point short of victory. Damn! I may try again.

One of the reasons I have this on the table is that there’s a version 3.0 of the Line of Battle system on the way and I wanted to remind myself of the strengths and weaknesses of the system. I am intrigued to see what will change. Meantime, if serious ACW tactical-level gaming is your thing, I recommend the system wholeheartedly.

Star Realms: Rise of Empire

Cover of the rulebook.

Star Realms is a non-collectible deck-building card game, primarily suited for two players (though multi-player is possible) with a science fiction theme and easy core mechanics. Each player starts with his own small deck and 50 authority (life). The first player to reduce his opponent’s authority to 0 wins.

The tracking device used to keep score.
This nifty device, making it easy to track your authority (life) comes with the game.

Card play provides resources, combat damage, and boosts to your authority (life).

  • You use the resources to buy new cards to add to your deck. But first, in general, they go to your discard pile and so take time to be available.
  • You use the combat damage to reduce your opponent’s authority.
  • You add boosts to your own authority, making it harder for your opponent to win.

In your turn, you may play all of your cards. At the end of your turn, played cards and purchased cards go to your discard pile, and you draw new cards from your deck. When your deck is exhausted, you take the discard pile, shuffle it, and that’s your new deck.

Most cards belong to a faction. Some cards have a basic effect and an additional effect that is available if you simultaneously play a card of the matching faction. Therefore, making your purchases has some strategic depth as you want to be able to trigger additional effects, but you also don’t want to focus only on one faction.

Image of a card in the game called "Knight".

Some cards trigger an effect when you buy them. It’s important to also maximize these effects, but it can be tricky.

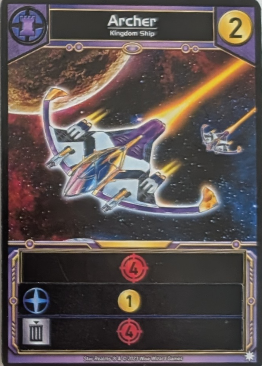
Image of a card called "Archer."

Some cards are bases and these, when played, stay on the table and continue to have an effect each turn unless your opponent destroys them. One type of base (outpost) even protects you by taking damage before your own authority is hit.

There are several games using the same key mechanics but with a different twist. This version is a campaign game of twelve scenarios with the following features:

  • Each player takes either the Star Empire or Trade Federation. Each starting deck is slighly different.
  • During play, you can upgrade your purchases and align them with your faction. This is done by applying stickers to your cards.
  • In each of the first four scenarios, you get a new set of upgrade stickers. In these scenarios you can also win by being the first to utilize five upgrades.
  • If your opponent wins four or more scenarios, you get one gambit for every victory over three he has. Gambits are typically one off benefits that reduce the cost of buying bases or add to damage of certain cards, and so on.
  • At a certain point random event cards are introduced. They do exactly what they say and tend to affect both players.

Roy and I just finished the twelve scenario campaign game of this Star Realms product. In the early scenarios, I built up a decent lead. But Roy was the clear winner in the second half and finally edged me out 11-10 in the final reckoning.

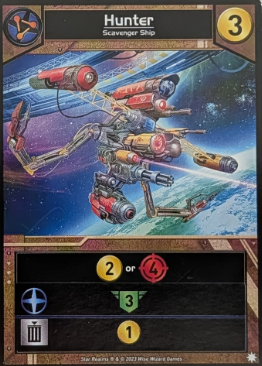
Image of a card called "Hunter".

I suspect that, in a sense, I was penalized for being first to four wins as that gave Roy access to the gambits. They weren’t cards with big effects, but they were a definite advantage. By the time I got some, the pendulum had swung.

The events were not too powerful and added some surprise and variety to the game.

We enjoyed playing the game and it held our interest so that we were keen to complete the campaign. However, as Roy pointed out, once we had done the upgrades in the first four scenarios, the game seemed to lose its focus: there were no more new sticker sheets and the victory points available for being the first to upgrade 20 purchases didn’t seem much of an incentive.

The scenarios did a reasonable job of presenting a different type of game, but truly it’s all about how quickly you can kill your opponent. The exception is the last scenario. Spoiler alert! In the twelfth scenario, both players have to join forces to fight the Blob. The Blob uses different mechanics to generate damage against the players and there are some interesting challenges. That scenario, for me, was better than most of the latter half-dozen.

Basic Star Realms is fun. This version was also fun. It could have been better with a bit more work done on some of the scenarios, though. The physical quality of the game is very high. The rules are clear and easy to understand. I Have had more than my money’s worth because I played through to the end of the campaign. So, if you think you will manage to copmplete the campaign, I’d recommend it. Otherwise, not.

For more information about the game, see here.

PanzerArmee Afrika

PAA at-start setup at  El Agheila, showing several stacks of Axis units versus a sole Allied brigade.
At-start setup at El Agheila

PanzerArmee Afrika (PAA) is a two-player game about the war in the desert from April 1941 to November 1942 designed by Jim Dunnigan. Game turns represent one month of real time, units are battlions, regiments, or brigades, and each hex is 12 miles.

PAA was released with Strategy & Tactics 40. The original components were good for their time, but now show their age. The counters are not backprinted. The map uses a limited color palette, is clear, and more than functional. Redmond Simonsen – responsible for Physical Systems Design and Graphics – produced some outstanding work at SPI and this early effort of his set a high standard. I don’t recall having any issue with the rules other than whether eliminated units get to counterattack (they do) and I worked that out by a close reading of the overrun process.

Note: SPI later sold the game to Avalon Hill (AH), who published their version around 1982. Images on this page are from the AH version. I have the original map and rules, but the counters are missing in action.

To give some context, before looking at the game’s key features, let’s start with the game turn sequence.

Game Turn Sequence

Each game turn has an Allied player turn followed by a German player turn. The game turn sequence is:

  1. Supply Determination Phase
  2. Command Control Phase (Allied player only)
  3. Movement Phase
  4. Combat Phase
  5. Replacements and Reinforcements Phase

Supply

No game about this campaign would be complete without supply rules. PAA’s supply rules are easy and essential to master if you want to succeed. Supply flows from a source via depots (counters on the map). Depots can form a chain, extending supply as far as desired. However, you need to use your transport facilities (a truck counter) to move depots and you only have one truck. You can create another truck by sacrificing some units, but it’s a heavy price to pay.

  • Units more than 20 movement points from a depot (connected to a supply chain) are out of supply. They defend at half strength and can neither attack nor move. They are also known as sitting ducks.
  • Units within 20 movement points (and more than 8) of a depot (connected to a supply chain) are generally supplied, meaning they can move and defend at full strength, but their attack strength is halved.
  • Units within 8 movement points of a depot (connected to a supply chain) are attack supplied, meaning they can move, defend, and attack at full strength.
  • Units within 8 movement points of a depot (connected to a supply chain) which they consume in an attack are maximum attack supplied, meaning they attack at double their normal strength.

Therefore, in this game, you can quickly tell that each side needs to guard its supply lines. These straightforward rules do a nice job of representing the realities of warfare in this arena. You can quibble about the details, but the general impact seems to work.

Image of German and Italian units approaching Allied defenders.
A tentative start by the Germans as they ponder what route to take.

Command Control

Before the Allied player moves, he has to roll for command control. The result of each roll is 3 numbers. If the number of the hex a unit or stack is on ends with one of these generated numbers, the unit or stack sits on its hands for the turn and does nothing; it may neither move nor attack.

This implementation of a restriction on the player’s control of his units is interesting. It’s not the first time something like this was used as a similar limitation was applied to barbarian units in Fall of Rome. However, that was a case of the enemy to the solitaire player being handicapped. Here, it’s you – if you’re the Allied player – who has to contend with this. It’s realistic, but it’s clunky. As printed, players can (and did) try to minimize the effects by putting their units on hexes with humber endings that come up less often.

A better process to achieve the same goal was to make a pool of 10 chits and randomly draw three chits, refilling the pool after each draw. This way, each hex was equally at risk.

An even better option was to take a broad brush approach, ignore the existing table and hex numbers and instead roll a six-sided die for each unit or stack, 1-2 meaning the units were affected and 3-6 meaning they were free of any restriction. More rolls of the die, but more chaos.

At the time it didn’t bother me that the German player got off scot-free. Now, I’m more inclined to believe the rule should also apply to the German player, but less severely. For example, using the last mentioned option, only a roll of 1 would affect the German player.

Movement

The units in this game had huge movement allowances: 40 movement points (MP) for the Italians, 50 MP for the Commonwealth units, and 60 MP for the Germans. This gave the game a very different flavor.

In my limited playing experience, it made the Allied player focus every turn primarily on trying to prevent the Germans sweeping around the flank and cutting off supply. Only when that position was secure, could the Allied player think about advancing, slowly. I have seen online discussions suggesting the game was broken because the German player could always easily achive that flanking maneuver, but the responses and my own play leads me to think that it’s far from a given. The German player has his own challenges about keeping his flanking forces in supply. A cautious, careful Allied player – assuming command control doesn’t screw him over completely – should be able to stay out of trouble. The discussion, however, shouldn’t hide the fact that it’s fun to have such liberated movemnent abilities.

Where the large MP numbers do have an adverse affect is on the simulation value. PAA is a good game, possibly a great game, but having one side being powerless – ie., sitting still – in the face of the enemy’s huge movement potential, is not realistic. There were optional rules kicking about that gave the non-moving player some reaction ability. (Look, for an example, at the AH version.) I have no experience of them. If I had the time or inclination, I would experiment by halving the MP of all units and doubling the number of turns, so each represented two weeks.

Combat

PAA used combat differential instead of combat odds. So, 6 strength points (SP) attacking 2 SP gave a +4 differential. This was the same as if 12 SP were attacking 8 SP. However, despite the differeng size of forces, the potential casualties remained the same. The other new tweaks on show here, or at least new to me, were (a) allowing the defender a chance to counterattack, even if eliminated so that no attack was risk free, and (b) overrun combat, allowing a moving stack to eliminate an enemy unit or stack during combat if it had a high enough combat differential.

Reinforcements and Replacements

PAA was also unusual in having reinforcements and replacements arrive at the end of a game turn instead of the more usual arrival at the start. This may have been done to make it easier for the Allied player who has to cope, additionally, with units being withdrawn. Dealing with the requirement at the end of the turn gave the Allied player extra time to get the withdrawing units back home. Failing to do this allowed the German player to pick the withdrawing unit; something to be avoided.

Overall

PAA is a good, challenging game. It’s easily accessible, there are not too many counters to maneuver and you can get through some turns quite quickly. Combat is never risk free because even an eliminated force gets to counterattack before dying. It was innovative in its time and remains a benchmark design. To prepare this article, I took the game out for a spin and solitaired a few turns. It was fun.

The strikes against it are that it is too long at 20 turns (unless the Germans capture Alexandria), the command control procedures need to be simplified, and it falls short as a simulation. For example, the victory conditions give the Allies a marginal victory by holding Alexandria and having more than twice as many combat strength points as the Germans. The Germans can get a marginal victory by holding El Agheila and having more than half as many combat strength points as the Allies. There’s no incentive, in terms of victory, for either side holding Tobruk, for example. These conditions need tweaked to encourage more historical strategies. PAA would also benefit greatly from some shorter scenarios, and a decent reaction rule. (The AH one doesn’t convince me.)

Her’s the acid test: if someone asked me to play PAA, I’d gladly accept the challenge. PAA is a game that deserves to be played.

The Fall of Rome

On the table now is The Fall of Rome, the SPI game included with Strategy & Tactics 39 back in 1973. It is a solitaire game pitting you (as the Romans) against those threatening to bring down the empire. Designed by John Young, it has an area movement map and counters representing legions, militia, barbarians, and raiding parties. Each turn represents one year. There are five scenarios: 67 A.D, 247 A.D. 260 A.D., 332 A.D, and 420 A.D.

First, the perspective here is very high-level. Although each scenario attempts to recreate the situation facing a particular emperor, there is no distinction in the game between the differing leaders and their respective strengths and weaknesses. Instead, you are cast in the role and it will be your skill, judgement, and luck that will determine if you can keep the empire from falling.

In a similar vein, each legion strength point is the same as any other – no troop quality here – and, indeed, the respective military forces of legions, militia, and barbarians may break down and build up like money.

The components are perfectly serviceable, though basic. The map is clean, clear, and easy to follow. The counters are OK, but are not backprinted. The rules are deficient in several key areas, so ensure you have the errata before starting out.

Game Turn

  1. Internal Revolution Phase
  2. Non-Roman & Non-Loyal Roman Movement Phase
  3. Non-Roman & Non-Loyal Roman Combat Phase
  4. Barbarian Creation Phase
  5. Loyal Roman Movement Phase
  6. Loyal Roman Combat Phase
  7. Legion Rebellion Phase
  8. Control Determination Phase
  9. Barbarian Attrition Phase
  10. Tax Collection & Disbursement Phase
  11. Roman/Persian Replacement Phase
  12. Barbarian Bribe Phase
  13. Game Turn Record Phase

The game turn begins with a check to see if there is any internal revolution. If so, a subsequent die roll determines where the trouble starts and how big it is (how many Roman militia are revolting). For example, in the first scenario (67 A.D.), only a roll of 6 in the appropriate phase would generate an internal revolution. This is where some of the limited color is on show because each scenario has its own column on the table. So, a roll of 4-6 in the second scenario (247 A.D.) would mean there was a revolution. The subsequent die roll will typically generate revolts in various locations of various strengths.

Part of the Fall of Rome map showing Egypt with rebel milita facing loyal Roman forces.
Trouble in Egypt!

At this point, you should be able to guess if the game will be to your liking because that phase replicates much of what goes on in a turn: you roll the die and chaos ensues. This is not a criticism, just me emphasizing that there’s a large luck factor involved. In other words, you can play well and the game may still beat you.

Next up in the game turn, any at-loose Barbarian and non-loyal Roman type forces move in a preordered sequence. Roughly one-third of the post-publication errata was about this part of the game, and it’s easy to see why. The system tries to have the enemy forces move in a way that makes sense. For the Persians, for example, there is a priority list of areas they must try to control. (Persia is top of the list, followed by Mesopotamia, Armenia, Syria, and Asia, in descending order.) The Barbarians try to move to the nearest, richest, Roman-controlled Province, unless they are a raiding party, in which case it’s simply the nearest Province*. You roll a die each time a Barbarian force tries to move into a new Area, with 1-2 resulting on the move being canceled and the barbarians staying put. Note that Roman-controlled – and other scenario-specified – Provinces have Militia that pop up to fight the invaders.

In general, after these moves, combat takes place. (Barbarians etc. encountering barbarians fight immediately during movement.) Attacking is odds-based, requiring a minimum of 1:1 odds. So, if the Persian force of 15 strength points is on the march into Syria, a force of 6 strength points of legions, backed up by the 10 strength points of milita, will be safe. At times, these gamey tactics are essential. However, massing the right forces at the right place is not always so easy. Combat results are a combination of the usual eliminations and exchanges topped up with 1/2De – meaning half the defending force is eliminated – and 1/2Ex -meaning the defending force is eliminated and the attacker loses half the number of strength points the defender lost.

Then you must face the possibility of new Barbarian forces. In the first scenario (67 A.D.) you roll for this every second turn. In the second scenario (247 A.D.) you roll twice per game turn. In scenario five (420 A.D.) you roll four times a turn! Not every roll is guaranteed to bring about new Barbaraian forces – it’s about a 50% chance – meaning you once again face the vagaries of fate.

Part of the Fall of Rome map showing Picts and Romans in Britannia.
Here come the Picts!

After this, the loyal Romans get to move and fight. This is straightforward, though you need to be wary of having too many legions in the one Area as that increases the chances of a rebellion. And that’s what you check for next. Rebelling Roman legions may march on Rome or try to form an independent state.

Following this, you determine control for the Provinces, work out the effects of attrition on Barbarian forces, collect and spend taxes, bribe Barbarians, and finally advance the game turn marker.

Treasury

The Roman legions are there to do the fighting, but you need tax revenue – determined by the Provinces you control – to keep them in the field and to rebuild losses. Further, you can stave off Barbarian incursions by bribing them. So, your financial resources are key. You must repeat the bribes every game turn if they are to remain effective. If you are lucky enough, you can bring the bribes to an end when attrition has taken its toll and you have collected enough loyal legions to wipe the remnants out.

Game Play

Although the game turn sequence looks long, it’s largely self-explanatory and easily followed. This means you can quickly focus on working out what you need to do to survive and win. However, the game lacks any meaningful play aids – for example, to track the treasury amounts, to track Province control, and so on. So, if you try to play it as it is, you will quickly be reaching for pen and paper and may well find yourself drowning in crap. I solved this by creating my own handmade control and treasury counters, as well as markers to note the starting strength of the legions and the Persians (because you cannot rebuild beyond these starting strengths). Thereafter, play proceeded quite smoothly. I did spend a fair bit of time checking the rules out – especially when moving the Roman foes – in the first few turns, but that petered out.

Game play can be summarised thus: the baddies appear and you have to work out how to deal with them – military action or bribery. You put your plan into action and, inevitably, not all of it works. Then more baddies appear. Rinse, and repeat. In between it all, if you are fortunate, you can try and grab some extra territory (and tax revenue). There’s a reasonable game narrative and, if you win, a sense of achievement.

I played the first two scenarios. I won the first one quite easily. It took me several attempts before I won the second scenario.

It’s a fun game. It’s not a serious study of the subject, but it assuredly gives you a (high-level) flavor. It’s also a great example of game design, an opportunity to see, at this stage, what the state of the hobby was in solitaire gaming, and how the designer tackled the issues. For the time, it was pretty novel. It’s been suggested, but I don’t know for sure, that it was the first proper solitaire wargame. Quite a landmark. Incidentally, the supporting article in Strategy & Tactics 39 is well done.

I enjoyed my time with Fall of Rome.


*Provinces are named groups of one or more Areas on the map. For example, the Province of Persia has three Areas. However, Cyprus is a single Area Province. Rather unhelpfully, the rules sometimes refer to a Region, an undefined term that appears to be an alternative name for Provinces. I assume that at some point the game used Regions before it used Provinces and the change wasn’t universally implemented by the editorial team.


James Dunnigan famously described wargames as “paper time machines”. (It’s one of the fundamental pillars of my wargaming life.) The quote came to mind as I realized that by playing this game now, in 2025, I was not only travelling back in time to that of the Roman Empire, but also to 1973 when I first bought and played the game. (It was probably 1973 when I last played the game!) Fall of Rome triggered lots of happy and some wistful memories. The latter time-travel experience is indulgent nostalgia – and I love it.

Friedland

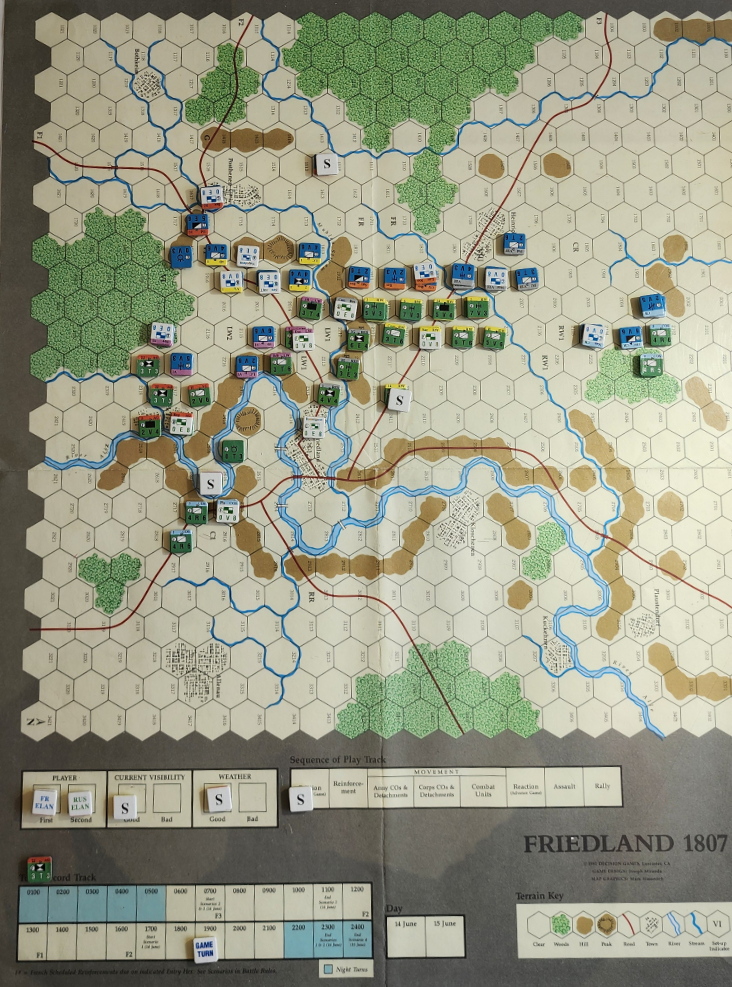
Friedland game by Joseph Miranda.

On my game table now is Friedland 1807, a division level game about Napoleon’s defeat of the Russians on 14 June 1807. No ground scale is given, but it appears to be about 4-500 yards per hex. Turns are one hour.

Designed by Joseph Miranda, this was the first (and only) of his Napoleonic Battles System games. The natural reaction might be to assume the short-lived series was due to Friedland being a bad game, but I don’t think that’s accurate. The first strike against the game was probably that it was published in Strategy & Tactics 151 alongside Vittoria resulting in the rules and charts for both games being intertwined. That made each game less accessible. The second strike against the game was that it uses some novel techniques, many of which reduce player control. In other words, the soldiers of your army don’t always do what you want them to do. The challenge of new systems and disobedient soldiers is a hard one for gamers to overcome! To add insult to injury, the rules were presented in a basic and advanced version. It would have been better to combine them into one standard system.

Let’s step back a moment and look afresh at the game. My thoughts are based on using the advanced rules apart from Fog of War. (More on that later.)

Each side’s game turn consists of:

  • Friction
  • Reinforcements
  • Command Control and Movement
  • Reaction
  • Assault
  • Rally

Before looking at the game turn sequence, some preliminary points:

  • Each army has a disintegration limit which, if matched or exceeded, causes bad things to happen. The disintegration level goes up with casualties and can be reduced by staying out of action for a complete turn.
  • Units have Engagement Zones (EZ) which seem to be Zones of Control, renamed. EZ are sticky, meaning that once in an EZ, getting out of it requires undergoing an attack from the enemy projecting the EZ.
  • A common result of combat is disorder, causing a unit to flip to its reverse side. This makes it slower and less effective in combat.

Now, let’s look at each part of the game turn sequence.

Friction

You roll 1d10 and refer to the appropriate table to find out if any random event has occured. This may be a temporary ammunition shortage (which magically affects the whole army) a change to army morale, bad weather, and so on.  

Reinforcements

Self-explanatory. Note that certain Friction results can bring on reinforcements one turn earlier.

Command Control and Movement

This is one of the core parts of the system. Each leader, from the army commander down, is rated as to his leadership: (A) Genius, (B) Good, (C) Standard, (D) Aggressive, and (F) Lethargic. To get a leadership result, starting with the army commander, you roll 1d10 on the Leadership Table and determine if the commanded leaders and soldiers do what you want (a Command result) or not (an Out of Command or Impetuous result).

For example, the French player starts with Napoleon. Being a Genius, he is going to give you a Command result 80% of the time. On that basis, he and all the French leaders within his command control range are good to go. Then, the French player rolls for any leaders outside Napoleon’s range and then any individual combat units out of any leader’s range.

This system highlights the difference in the quality of the leaders on each side. It also shows how dangerous Aggressive leaders can be as an Impetuous result forces the involved combat units to move adjacent to the enemy. Once adjacent, it’s not so easy to get free.

Reaction

This is where the opposing side gets to go. There’s lots of neat stuff here. First, reaction is subject to a roll on the Leadership Table. Second, there’s a neat optional rule that make Reaction checks mandatory. Why? It allows those Aggressive leaders and Impetuous results to throw a spanner in the works of both players.

Assault

There’s more innovation here. There are six combat results tables: one for artillery, two for cavalry (probe and charge) and three for infantry (skirmish, linear, and column). Combat is, generally, driven by the strength of the attacking force and the terrain, with many of the results requiring a morale check. Combat units are rated, in decreasing order of quality, as one of elite, veteran, trained, or rabble with a matching decrease in the chance to pass a morale check. The results are not your typical DR, DE, and EX. Instead, you get an alphabet soup of results including C (counterattack), P (pursuit – when cavalry can be deadly), and H (heavy cavalry charge). After a few combats, they are easily assimilated.

Note:

  • Out of command units can assault. I assume that’s to avoid even more die rolls, but if you think it’s more realistic to require them, it’s an easy fix.
  • Only light infantry may use the skirmish combat results table (CRT). However, there’s no restriction on the use of linear or column CRT. So, every gamer is going to pick the CRT which gives him the best chance of success. In reality, much would be dictated by doctrine. As a generalization, that means the French attacking using the column CRT. But the game gives them complete freedom which may be unrealistic.
  • The system includes Elan counters which each side can spend to speed a unit’s movement or enhance a combat. The French do better when using Elan for the column CRT, so maybe that goes part of the way to counter my criticisms about doctrine.
  • Artillery can blow away entire divisions, even at long range – up to three hexes. This may happen too often for comfort. I implemented a house rule which restricted such results to point-blank combat only.

Rally

In this part, you get to try and rally your disordered or shattered units.

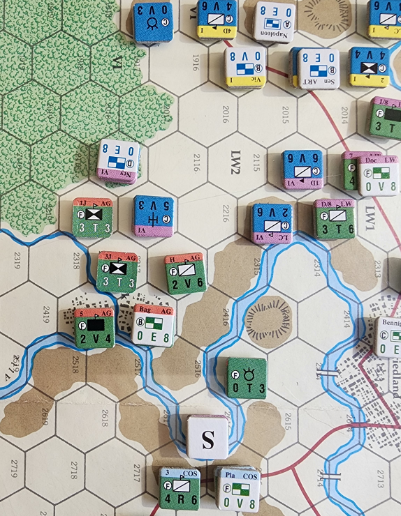
Part of the action from a game of Friedland.
It’s 14:00 on 14 June 1807 and the French VI Corps are driving a wedge between the Russian Left Wing and Advanced Guard forces, pinned against the Alle River. Will the Russian engineers get a pontoon in place quickly enough to allow a retreat?

So, how does it play?

My overall conclusion is that this game is a wee cracker – something of an overlooked gem. Like all games, it has its faults, and the packaging alongside Vittoria surely doesn’t help, but perseverance brings good rewards.

I should also say that the rules are in better condition than I initially thought. There are some rough edges, but nothing critical.  For example, it appears each side is supposed to have the possibility of gaining more Elan markers from the Friction Table, but the results are silent on this. As another example, engineers can put up pontoon bridges, but the rules are silent as to whether the engineer can move in the turn of creation. I don’t like how artillery all on its own imperiously defends against waves of cavalry charge. Also, the ability to (apparently) rally while still in an EZ doesn’t ring true. Even at this scale, I would expect some units to need to withdraw to recover. A house rule could fix that.

The command and control system, albeit there’s a lot of die rolling going on, does a pretty impressive job of replicating many of the issues the real combatants faced. The French are swift and decisive, but every so often, things go awry. In reverse, the Russians are unreliable, but can often spring a surprise. The lack of player control is good.

The combat system is unlike anything I have ever seen before. The absence of any combat ratios sure takes some getting used to. My hesitation in accepting the whole shebang is because my play generated one or two unusual results. Overall, the design for effect approach works reasonably. But I cannot help feeling that a 2d6 version of the combat results table would be an improvement. Also, while there is a rule about artillery fire being more effective against infantry if the artillery is stacked with cavalry, I’m not convinced the full scissors-rock-paper interaction of the three combat arms of Napoleonic times is shown here. Quite how that could be done at this scale is not obvious to me. At least you get some of the flavor.

So far as I can tell, the Friedland map scale is about 4-500 yards per hex. The closest development of the system seems to have been to treble the scale and go forward into the later part of the 19th century. The games Empires at War (here) and Chancellorsville (here) use much of the core command ideas. That makes them appeal to me. (I only have Chancellorsville & Plevna.) However, the combat system in these games is very old school and that is a big turnoff. One detail: the Empires at War command rules introduced an ‘F’ result meaning that the affected units had to fall back. That, I very much like. However, fitting it into the current 1d10 structure would be a struggle because it would probably happen too often to be realistic.

Summary: I have enjoyed my time with Friedland.

Fog of War

I am playing solo, so I didn’t attempt the fog of war rules. However, they look like they could be fun. Units are stored on a display off-map. Each counter on the map may represent a major force or a detachment. Depending on the visibility, you may try and see what is out there. When seen, the combat units are deployed on the map.

Dreams

If I ever get to meet Joseph Miranda, I would want to ask him why this series wasn’t continued. And, I’d love to understand the logic behind the different combat results tables. It will never happen, but I would love to create a new game using a 2d6 version of the tables – both CRT and command. I wonder if this would work for the American Civil War…

Why Now?

Why am I playing and writing about a game that is over 30 years old? Having retired, I now have a bit of time to scratch my gaming itch by playing some of the games in my collection that I have either never or barely played. (I won’t be able to play them all. Too many games. Not enough time!) I am also giving particular emphasis to looking back at my Strategy & Tactics magazines, but in no particular order) knowing that many of the games there got short thrift for one reason or another. SPI games should get some coverage to as befitting the S&T publishers. If I can keep going, there will be more of this type of blog post in the future.

Tip of the Hat

My thanks to fellow gamer John Forgy. John supplied me with a scan of the rules that allowed me to put together a set without any Vittoria material. That made assimilating thge rules easier. And our email exchanges helped me to focus my thinking about the game, play it extensively, and write about it.